
Owning an RV is amazing – you can travel wherever you want, whenever you want. But if there’s one thing that can quickly ruin that freedom, it’s a leaky roof. Even a small drip can cause stains, mould, and costly repairs down the line. Luckily, fixing these leaks doesn’t have to be complicated or expensive. With a little patience and the right products, you can handle many roof repairs yourself.
If you’ve got a trailer or motorhome, using rv roof magic makes DIY fixes easier and more reliable. It’s what thousands of RV owners trust to keep their roofs waterproof and strong.
Why DIY RV Roof Repairs Make Sense
Let’s be honest – calling a professional every time there’s a leak gets pricey fast. Doing it yourself saves money and gives you control over the materials and process. You’ll also get a sense of pride knowing you fixed it yourself. Products like RV roof magic and RV roof sealant are designed for homeowners and travelers alike, so even beginners can handle them.
Tools and Materials You’ll Need for RV Roof Repair
Before you climb onto your roof, make sure you have everything:
- rv roof sealant – for cracks, seams, and problem spots.
- rv roof coating – for a full waterproof layer.
- Medium-nap roller (3/8-inch) and chip brushes.
- Drill with a mixer for blending the coating.
- Roof Protect cleaner to prep the surface.
- Use painter’s tape to protect edges and accessories.
- NIOSH respirator if you’re working in an enclosed space.
Having everything ready makes the job smoother and faster.
Step 1: Inspect Your RV Roof
Start by walking the roof (safely!) and checking for:
- Cracks or gaps around seams.
- Loose caulking near vents, AC units, or skylights.
- Any soft spots or stains.
Take notes or mark problem areas. This will help you know exactly where to focus your repair.
Step 2: Clean the Roof Thoroughly
A clean roof is essential. Dirt, grease, or mildew can prevent sealant from sticking. Use rv roof protect to scrub the roof – it even kills mould and spores.
If you have a light power washer, that’s ideal. If not, a stiff brush works fine. Just make sure the roof is completely dry before you start applying anything – moisture is the enemy here.
Step 3: Repair Cracks and Seams
Before coating, fix the obvious leaks:
- Remove old or damaged caulk.
- Apply butyl mx caulk along seams and problem areas. This caulk works perfectly with RV Roof Magic and won’t void your warranty.
- Smooth it out for a clean, even finish.
Even small cracks can cause leaks, so take the time to do this right.
Step 4: Optional Flash Coat for EPDM Roofs
If your RV has an older EPDM roof, a light “flash coat” of RV Roof Magic helps prevent minor bubbling as it dries. Just a thin layer – about 1.5 gallons for 200 sq. ft. – is enough.
Let it dry completely (3-4 hours, depending on the weather) before moving on to the main coat. This step isn’t always needed, but it’s a good insurance policy for older roofs.
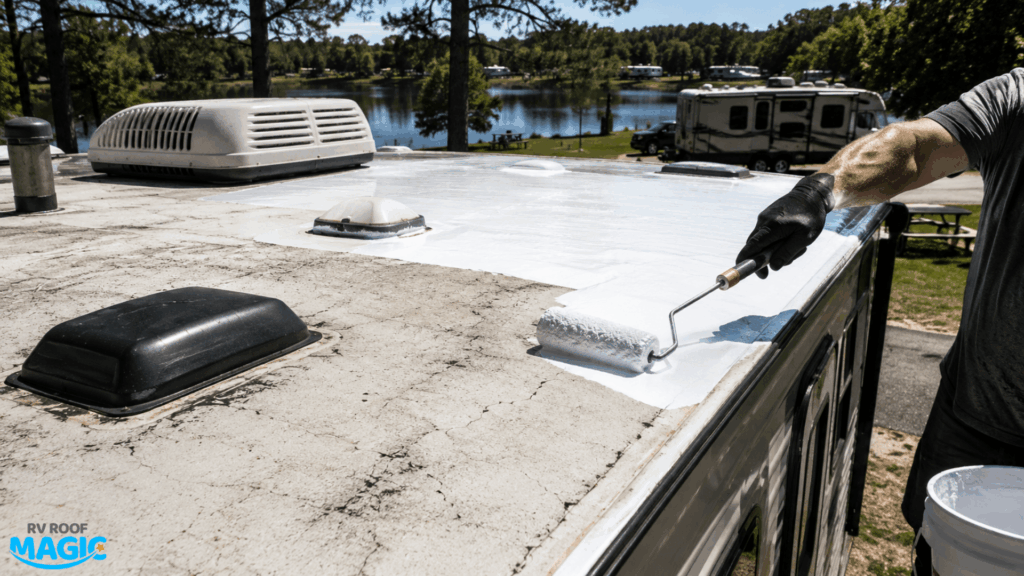
Step 5: Apply the Main RV Roof Coating
Here’s the core step:
- Mix your rv roof coating for about five minutes using a drill mixer.
- Use a medium nap roller to apply it in sections (about 50 sq. ft. per gallon). Use a chip brush for corners and vertical edges.
- Tape off any areas you don’t want coated – vents, AC units, and trim.
- Let it dry to the touch in 3-4 hours. If you want a second coat, wait at least 24 hours.
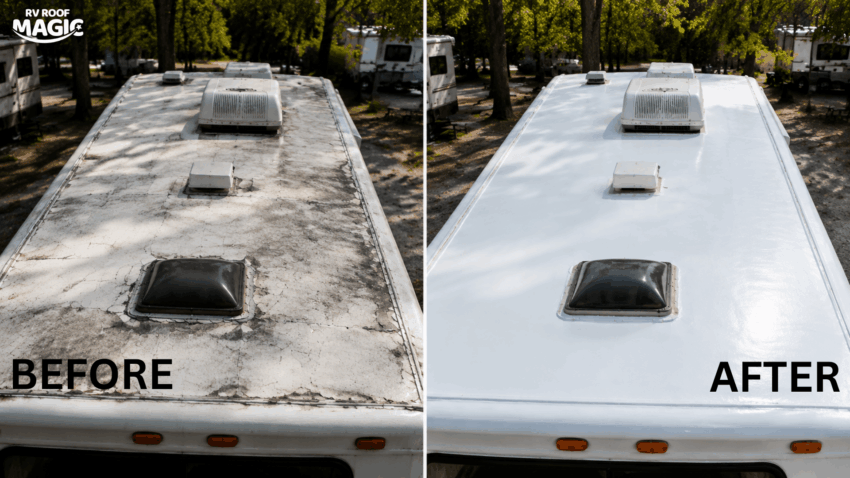
Once dry, your roof will have a seamless, waterproof layer that withstands UV rays, ponding water, and temperature changes.
Step 6: Maintain Your RV Roof
Don’t forget that a little upkeep goes a long way:
- Clean the roof annually with rv roof protect.
- Check seams and caulking – reapply as needed.
- Inspect for new cracks after heavy storms or winter weather.
Routine maintenance keeps your roof in good condition and prevents recurring leaks.
Why RV Roof Magic Works for DIY
Using rv roof magic is smart for a few reasons:
- Proven Track Record: Over 25 years of protecting RV roofs.
- One-Coat Application: Saves time and effort.
- Durable: Stands up to sun, rain, and ponding water.
- Easy for DIY: No special skills required – follow the instructions.
- Works on Most Roof Types: EPDM, TPO, fiberglass, metal – you name it.
It’s the kind of product that gives you confidence while keeping your RV roof protected for years.
Wrapping Up
Fixing RV roof leaks yourself doesn’t have to be scary or expensive. A careful inspection, thorough cleaning, RV roof sealant, and a good coat of rv roof coatingcan save you money and stress.
Take control of your RV maintenance, and your roof will stay strong, dry, and ready for the adventures ahead. If you haven’t tried it yet, check out RV Roof Magic for the tools and guidance you need.