
There is a specific kind of dread that hits when you’re relaxing in your camper and suddenly feel a cold “drip” on your shoulder. Finding a leak in your RV is frustrating, but it isn’t the end of the road. Most of the time, these issues can be solved right in your driveway without handing over thousands of dollars to a service center.
However, many people make the mistake of running to a big-box store for generic house caulk or a cheap hardware-store sealant. An RV isn’t a house; it’s a vehicle that vibrates, twists, and expands in the sun. You need a solution that actually bonds to the surface, not just a temporary patch. This guide walks you through the right way to perform an rv roof repair using professional-grade methods.
1. Inspecting the Damage (The “Where” and “How”)
Before you grab a ladder, you need to understand that water is sneaky. Where the drip hits your floor is rarely where the leak started on the roof. Water travels along the internal frame before exiting.
- Check the “Busy” Areas: Most leaks start around the protrusions – AC units, skylights, plumbing vents, and the TV antenna.
- The Chalk Test: Rub your hand on the roof membrane. If it comes away covered in a white, powdery residue, your roof is “chalking” or oxidizing. This means the material is thinning out and becoming porous.
- Look for Cracks: Inspect the existing rv roof sealant around the edges. If it looks like dried-out, cracked desert mud, it’s no longer doing its job.
2. Prep Work: The Most Important Step
You can buy the best product in the world, but if you apply it over dirt or tree sap, it will fail. Adhesion is everything.
Start by cleaning the roof thoroughly. We recommend using a cleaner like Roof Protect to remove oxidation and grime. Stay away from any cleaners containing petroleum or citrus oils; these can damage EPDM rubber and cause it to swell or peel. Scrub it down, rinse it well, and – this is the hard part – let it dry completely. Even a tiny amount of moisture trapped under your new coating can cause bubbles later.
3. Addressing the Seams and Joints
Think of the seams as the “elbows” of your RV. They do the most moving. If you have deep cracks or gaps, you need to reinforce them before doing a full coat.
A great trick is to use a “bridge” method. Apply a bit of sealant, lay down a strip of Poly Fabric, and then saturate it with more sealant. This creates a reinforced patch that withstands highway vibrations without snapping. If you’re dealing with old silicone, make sure to scrape it off entirely, as almost nothing sticks to old silicone residue (including new silicone).
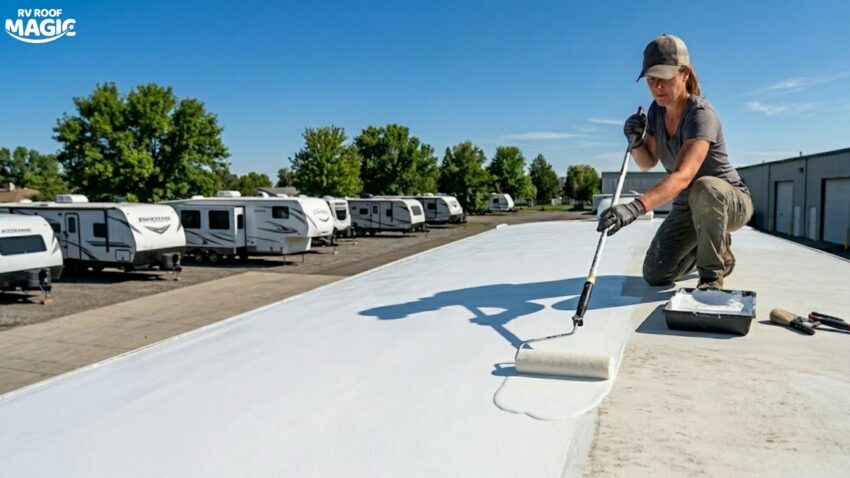
4. Applying the Coating: The One-Coat Approach
This is where RV Roof Magic stands apart from the DIY kits you find at retail stores. Most systems require a primer, then a base, then a top coat. That’s a three-day process where you’re constantly checking the weather forecast.
Our system is a true one-coat application. Here is how you do it:
- The Mix: Don’t just stir it with a stick. Use a drill mixer for at least five minutes. You need to activate the polymers to ensure the chemical bond forms.
- The Application: Use a 3/8″ nap roller. It’s best to “cut in” around the vents and AC units with a brush first, then use the roller for the large flat areas.
- Self-Leveling: Don’t worry if you see roller marks or a few bubbles initially. The product is designed to level itself out. Within 20 minutes, those marks will disappear into a smooth, seamless finish.
5. Timing the Weather
Since this is a solvent-based rv roof coating system, it is much more forgiving than water-based products. However, you still want a clear window.
- Temperature: Aim for a day where it stays above 50°F.
- Rain: It becomes waterproof much faster than other brands. As long as it has about three hours to “skin over” before a heavy rain, you should be fine. If the temperature drops at night, the curing process pauses and restarts when the sun comes back up.
Why a Professional Sealant Beats a “Quick Fix”
It’s tempting to slap some tape over a leak and call it a day, but that’s a gamble. A total roof replacement can cost upwards of $8,000. By choosing high-quality rv roof coatings, you’re essentially “re-skinning” your vehicle for a fraction of that cost.
What makes this different?
- Chemical Cross-Linking: Instead of just sitting on top of the roof like a layer of paint, our sealant actually bonds with the existing membrane, becoming part of the roof itself.
- UV Reflection: A white, reflective roof doesn’t just stop leaks; it keeps the interior of your RV much cooler during those summer trips.
- No Primers: It saves you an entire day of labor because it doesn’t require a separate primer for EPDM, TPO, or fiberglass.
Keeping Your RV Roof Healthy Long-Term
Once you’ve finished your rv roof repair, the maintenance becomes incredibly easy.
- Annual Checks: Take a quick look twice a year to make sure no new punctures have happened from low-hanging branches.
- Easy Cleaning: Dirt won’t stick to the new surface as easily as it did to the old, chalky rubber.
Final Thoughts
Fixing a leak doesn’t have to be a high-stress event. If you take the time to clean the surface properly and use a product designed specifically for the unique stresses of an RV, you can get another 15+ years out of your roof.
Stop chasing the same leaks every season. Do it once, do it right, and get back to enjoying the road. Check out our full line of rv roof sealant and repair tools at RV Roof Magic to get everything you need for the job.