
If you own an RV or motorhome long enough, roof seams, cracks, and punctures are almost guaranteed to show up. The good news is that with the right RV roofing solutions, you can restore your roof, stop active leaks, and add years of life to your rig—all in a single day—without complicated multi-coat systems or primers.
That one‑day, one‑coat approach is precisely what RV Roof Magic is designed for. It is a specialized RV roof material and coating system designed for RVs and motorhomes, with a long history of successful RV roof leak repair.
Below is a practical, human, step‑by‑step guide to repairing seams, hairline cracks, and punctures using RV Roof Magic as your primary motorhome roof sealant.
Why RV Roof Magic for Seams, Cracks, and Punctures?
RV roofs take a beating—UV exposure, temperature swings, ponding water, and constant movement on the highway. Over time, these stresses show up as:
- Opened seams along roof edges or around accessories
- Fine cracks in aging coatings or membranes
- Punctures from branches, debris, or old hardware
Many products claim to address these issues, but they often require multiple coats or primers, or are compatible only with one type of RV roof material. RV Roof Magic is engineered differently:
- It goes over a wide range of existing roof surfaces in a single coat.
- No primer is needed in most situations, so you save time and labor.
- It is explicitly formulated as an RV roofing solution with a 25+ year history in the RV industry.
- Once cured, it becomes a seamless, flexible membrane that helps prevent future leaks.
For owners who want RV roof leak repair done in one day—apply today, drive away tomorrow—this system is a perfect fit.
Step 1: Inspect the Roof and Identify Problem Areas
Start with a slow, careful walk-through of the roof (only if it is safe to walk on your particular RV roof material). Look for:
- Seams that are lifting or separating
- Cracks in older coatings, especially around vents or skylights
- Blisters, soft spots, or small punctures
- Areas where old caulking has dried, cracked, or pulled away
Mark or mentally note every weak point. The goal is to ensure that, when you apply RV Roof Magic, all areas are fully covered and sealed for the long term.
If your skylight is beginning to oxidize or show signs of age, you may also consider pairing your project with the clear Skylight 911 product available on the same site for added protection.
Step 2: Clean and Prepare the Surface
Any RV roofing solution is only as good as the preparation behind it. Before using any motorhome roof sealant or coating, the surface must be clean, dry, and free of loose material.
On the day of your repair:
- Remove loose debris such as leaves, branches, or dirt.
- Wash the roof using an appropriate cleaner to remove chalking, grease, and road film.
- Rinse thoroughly and allow the roof to dry completely.
This cleaning step helps the RV Roof Magic coating bond tightly to your RV roof material so it can deliver the long‑term protection it is known for.
Step 3: Address Seams, Cracks, and Punctures
Before the whole application, give extra attention to each problem area.
For seams:
Make sure old caulking or loose sealant that is failing is removed or trimmed back. The goal is to create a solid base so that, when RV Roof Magic is removed, it encapsulates and seals the seam, forming a continuous membrane along the length of the roof.
For cracks:
Hairline cracks in existing coatings or membranes are common signs of aging. Once cleaned and dry, these cracks will be covered and sealed by the coating. Because the product is formulated to remain flexible, it moves with the RV rather than re‑cracking.
For punctures:
Additional minor punctures in the roof surface can be sealed during your RV roof leak repair by ensuring the coating fills and bridges the area. Larger structural damage may require patching or repairing the base material before coating. Once sound, RV Roof Magic is applied to the area to prevent water intrusion and protect it from further degradation.
Step 4: Choose the Right Amount of Product
RV Roof Magic is available in different sizes to match the scope of your project:
- 1‑gallon containers that typically cover about 50 square feet
- 5‑gallon pails that typically cover about 200 square feet
This makes planning straightforward. Measure your roof, factor in any additional attention around seams, and select the size that fits your needs. Because no primer is required for most surfaces, you only need to account for the coating itself when planning materials.
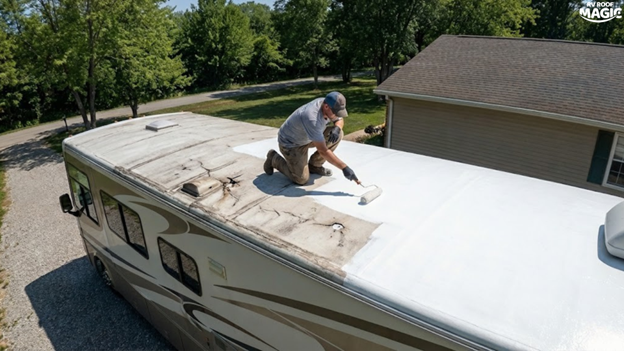
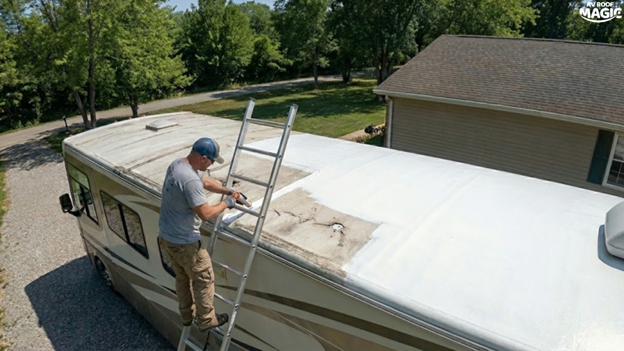
Step 5: One‑Coat Application for All‑Day Protection
One of the most significant advantages of RV Roof Magic as an RV roofing solution is its one‑coat application. After cleaning and preparations are complete:
- Stir the product thoroughly as directed on the container.
- Pour a manageable amount onto the roof.
- Use a roller and brush to spread the coating evenly, working it into seams, around vents, and over all cracks and punctures.
The product is designed to be applied once and left to cure. There is no need to return for second and third coats, which is a significant time-saver for busy RV owners who want a same‑day RV roof-leak repair solution.
Because it is designed specifically for the RV industry and has undergone ASTM testing, it is built to deliver strength and quality for long‑term use on the road.
Step 6: “Apply Today, Drive Away Tomorrow”
Another significant benefit of choosing RV Roof Magic as your motorhome roof sealant is the quick turnaround. The system is designed so that you can:
- Apply the coating in a single day.
- Allow it to cure correctly.
- Be ready to drive the next day.
For full‑time RVers or anyone planning a trip, this is a huge advantage. Instead of your rig being tied up for days with traditional multi‑coat systems, your roof repairs are handled quickly and efficiently.
Long‑Term Benefits of Using RV Roof Magic
Repairing seams, cracks, and punctures is about more than stopping short-term leaks. A quality RV roofing solution should also extend your roof’s lifespan and protect your investment.
With RV Roof Magic, users can expect:
- A seamless, flexible membrane that helps prevent new leaks from forming
- Protection against harsh weather and roof movement on the road
- A proven track record in the RV industry spanning more than two decades
Rather than recoating every few years, this system is engineered to deliver many more years of service than traditional products.
Final Thoughts: A Practical One‑Day Roof Renewal
Dealing with roof seams that have opened, cracks spreading across your roof, or punctures that let water into your RV can feel overwhelming. But with the right RV roof material and coating system, the repair process becomes much more manageable.
By cleaning thoroughly, focusing on problem areas, and applying RV Roof Magic as your primary motorhome roof sealant, you can:
- Seal seams, cracks, and punctures in a single day.
- Protect against future leaks.
- Extend the usable life of your RV roof without complicated multi‑step systems.
When your goal is fast, reliable RV roof-leak repair and long‑term protection, RV Roof Magic offers a straightforward, one‑coat solution tailored for RV owners who want to spend more time on the road and less time worrying about their roof.