
Let’s be honest: nobody buys an RV because they’re excited about roof maintenance. You bought it for the open road, the mountain views, and the freedom to wake up somewhere new every morning. But here’s the cold, hard truth – your roof is the only thing keeping those “great outdoors” from moving into your living room.
Most factory-installed roofs begin to show their age after just five years. Between the UV rays beating down and the constant vibration of highway travel, your roof is under a lot of stress. If you want to avoid a massive repair bill, you need a solid game plan. Here are five pro tips for mastering your next repair using the right rv sealant and techniques.

1. Don’t Wait for the Drip: The Art of the Visual Hunt
By the time you see a water stain on your interior ceiling, the damage has likely been happening for months. Water is patient; it finds the path of least resistance. To stay ahead of it, you need to be your own inspector.
Climb up there at least three times a year. Don’t just walk around – get low. Look for leaks in the “high-traffic” areas: the seams around your AC unit, the base of the TV antenna, and the edges of your skylights. If you see “alligatoring” (tiny, crisscross cracks), your current rv roof repair has lost its elasticity. That’s your signal that it’s time to intervene before the next storm hits.
2. The “Squeaky Clean” Rule: Why Prep is 90% of the Job
I’ve seen people buy the best products on the market, apply them over a dirty roof, and then wonder why they peel off six months later. It’s simple: nothing sticks to dirt. Before you touch a bottle of rv sealant, you have to strip away the oxidation and road grime. We recommend a deep scrub with a cleaner like roof protect. It’s designed to break down contaminants and kill mold spores without using harsh petroleum distillates that can actually damage your roof membrane. Scrub until that chalky residue is gone. A clean roof is the difference between a repair that lasts ten years and one that lasts ten days.
3. Choose Chemistry Over Convenience
It is incredibly tempting to run to the local hardware store and grab a bucket of “white roof paint.” Resist that urge. Those products are usually water-based acrylics designed for houses that don’t move. Your RV is basically a rolling earthquake. It twists, turns, and flexes.
You need a product with “memory.” RV Roof Magic is a solvent-based liquid rubber. Unlike water-based coatings, it chemically bonds to your existing roof, creating a single, seamless membrane. Because it’s solvent-based, it can handle “ponding water” (those pesky puddles that sit on your roof after a storm) without re-emulsifying or breaking down. It moves when your RV moves.
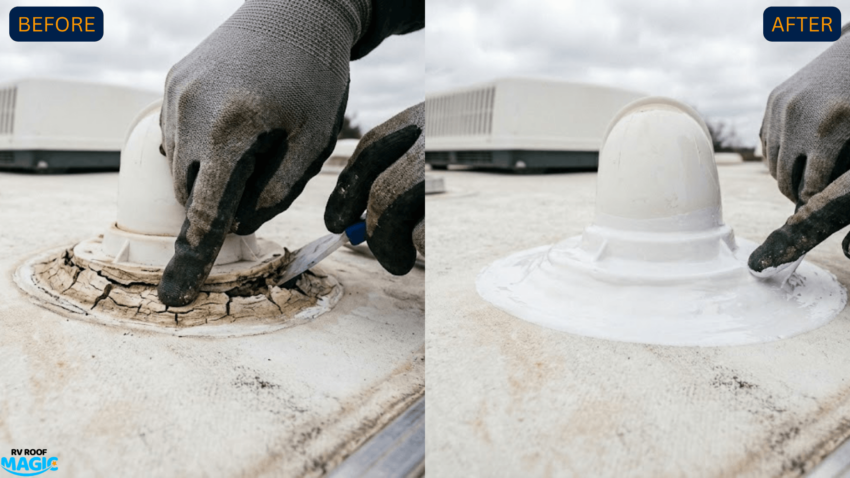
4. Fix the “Hot Spots” Before the Final Coat
Think of your roof repair like a car paint job – you have to fix the dents before you spray the color. If you have a physical tear from a tree branch or a seam that has completely separated, a thin rv coating isn’t enough on its own.
Use specialized tools for the heavy lifting:
- Butyl MS Caulk: Best for those tricky joints around vents.
- Seam Tight & Poly Fabric: This is the “cast” for your roof’s broken bones. You apply the fabric over the crack and saturate it with Seam Tight to create a reinforced bridge that is arguably stronger than the original roof.
5. Master the “One-Coat” Strategy
One of the best things about the RV Roof Magic system is that it’s a “one-and-done” application. You don’t need a primer, and you don’t need three coats. However, timing is everything.
Try to plan your project for a day when the temperature is at least 50°F and rising. Avoid working in the blistering midday sun, which can cause the product to dry too quickly on the surface. Mix your RV coating with a drill mixer for a full five minutes to get those solvents working, and use a 3/8-inch nap roller. If you work in manageable six-foot sections, you’ll ensure a thick, even application that looks professional and, more importantly, stays watertight.